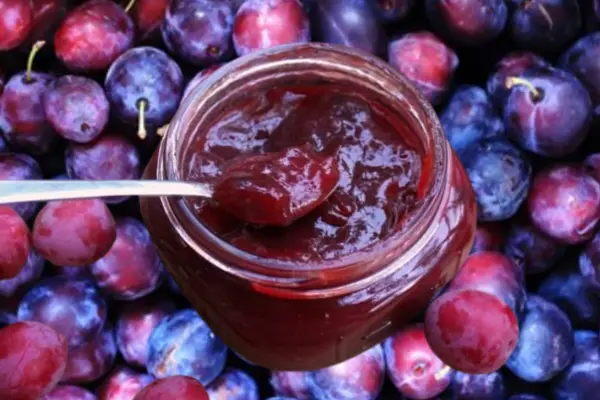
Ever taken a stroll along the coast and stumbled upon those tiny, vibrant beach plums? They’re a treasure trove of flavor waiting to be turned into something extraordinary.
Growing up near the beach, I loved picking these little gems with my family and turning them into the sweetest Beach Plum Jelly.
Now, I’m sharing this simple, foolproof Beach Plum Jelly recipe with you, so you can bring a taste of the coast right into your kitchen.
Let’s dive in and make some jelly magic happen!
Quick & Easy Beach Plum Jelly Recipe For Beginners
This jelly captures the tangy-sweet flavor of wild beach plums in a perfectly spreadable form. Made with just a handful of ingredients, it’s a coastal delight anyone can make.
Recipe Overview
- Prep Time: 20 minutes
- Cook Time: 45 minutes
- Cuisine: American
- Course: Condiment
- Difficulty: Easy
- Yield: About 6 half-pint jars
- Calories Per Serving: 40 (per tablespoon)
Ingredients
Here’s everything you’ll need to whip up a batch of homemade Beach Plum Jelly:
- 4 cups beach plum juice (from about 4 pounds of beach plums)
- 7 cups granulated sugar
- 1 pouch liquid pectin (3 ounces)
- 1 cup water (for juice extraction)
Ingredient Notes:
- If beach plums aren’t available, you can substitute wild plums or even sand plums for a similar flavor.
- Liquid pectin ensures the jelly sets perfectly, but powdered pectin works in a pinch—just follow its package instructions.

Instructions
Step 1: Prepare The Beach Plum Juice
- Wash the beach plums thoroughly to remove any dirt or debris.
- Place the plums in a large saucepan, add 1 cup of water, and bring to a boil.
- Reduce heat and simmer until the plums are soft and bursting, about 15 minutes. Stir occasionally to prevent sticking.
- Strain the mixture through a jelly bag or fine mesh strainer into a large bowl. Let it drip overnight for a clearer juice, or press gently for a more robust flavor.
Step 2: Make The Jelly
- Measure 4 cups of beach plum juice and pour it into a large saucepan.
- Add the sugar, stirring until dissolved. Heat the mixture until it reaches a rolling boil.
- Stir in the liquid pectin quickly and return to a full boil. Boil hard for 1 minute, stirring constantly.
- Remove from heat and skim off any foam with a spoon.
Step 3: Jar The Jelly
- Carefully ladle the hot jelly into sterilized jelly jars, leaving 1/4 inch of headspace.
- Before putting the lids on, wipe the rims and tighten the bands with your finger.
- To seal the jars, process them in a boiling water bath for ten minutes.
Tips And Tricks
- Perfect Set Every Time: Always boil the mixture vigorously after adding the pectin to ensure the jelly sets properly.
- Test The Set: Drop a bit of jelly onto a cold plate and let it cool. If it wrinkles when pushed, it’s ready.
- Storage: Store sealed jars in a cool, dark place for up to a year. Refrigerated jars must be used within three weeks of opening.
- Pairings: This jelly pairs beautifully with toast, scones, or even as a glaze for roast meats.
Serving Suggestions
Serve your Beach Plum Jelly with:
- Freshly baked bread or biscuits.
- A cheese platter—brie or goat cheese works wonders!
- As a topping for ice cream or pancakes.
What Is Beach Plum Jelly?
Beach Plum Jelly is a sweet and tangy spread made from the juice of beach plums, a wild fruit found along coastal areas like Cape Cod. Its unique flavor is both tart and sweet, making it a favorite among jelly enthusiasts.
What Is Beach Plum Jelly Made Of?
The primary ingredients are beach plum juice, sugar, and pectin. These combine to create a perfectly balanced, spreadable jelly that captures the essence of the coast.
What Are the Uses of Beach Plums?
Beach plums aren’t just for jelly! They can be used to make jams, wines, and sauces. Their tart flavor makes them versatile for both sweet and savory dishes.
What Does Beach Plum Taste Like?
Beach plums have a unique flavor—imagine a mix of tart cherries and sweet plums with a slight floral note. It’s a taste that’s distinctly wild and coastal.
Frequently Asked Questions
Can I Use Frozen Beach Plums For This Recipe?
Yes! Just thaw them before starting, and proceed with juice extraction as normal.
How Do I Know If My Jelly Has Set Properly?
Perform the plate test: place a drop of jelly on a cold plate and tilt it. If it holds its shape, it’s ready!
Can I Reduce The Sugar?
Sugar is essential for the jelly to set and preserve. Reducing it might affect the texture and shelf life.
What’s The Best Way To Sterilize Jars?
Wash jars in hot, soapy water, then boil them in a large pot for 10 minutes. Keep them warm until ready to use.
Final Thoughts
Now it’s your turn to bring the taste of the coast to your kitchen! This Beach Plum Jelly Recipe is a simple, satisfying way to savor the unique flavor of beach plums year-round.
Give it a try, and let me know how it turns out. I’d love to hear your stories and see your creations!
Happy jamming!

Homemade Beach Plum Jelly Recipe: Easy And Delicious!
Ingredients
- 4 cups beach plum juice from about 4 pounds of beach plums
- 7 cups granulated sugar
- 1 pouch liquid pectin 3 ounces
- 1 cup water for juice extraction
Instructions
Step 1: Prepare The Beach Plum Juice
- Wash the beach plums thoroughly to remove any dirt or debris.
- Place the plums in a large saucepan, add 1 cup of water, and bring to a boil.
- Reduce heat and simmer until the plums are soft and bursting, about 15 minutes. Stir occasionally to prevent sticking.
- Strain the mixture through a jelly bag or fine mesh strainer into a large bowl. Let it drip overnight for a clearer juice, or press gently for a more robust flavor.
Step 2: Make The Jelly
- Measure 4 cups of beach plum juice and pour it into a large saucepan.
- Add the sugar, stirring until dissolved. Heat the mixture until it reaches a rolling boil.
- Stir in the liquid pectin quickly and return to a full boil. Boil hard for 1 minute, stirring constantly.
- Remove from heat and skim off any foam with a spoon.
Step 3: Jar The Jelly
- Carefully ladle the hot jelly into sterilized jelly jars, leaving 1/4 inch of headspace.
- Before putting the lids on, wipe the rims and tighten the bands with your finger.
- To seal the jars, process them in a boiling water bath for ten minutes.
- Jet’s Ranch Recipe: Make The Famous Dip At Home - April 12, 2025
- James Hemings Macaroni And Cheese Recipe – History On A Plate - April 3, 2025
- French Dip Squares Recipe – Better Than A Sandwich! - March 25, 2025


